Close Menu
Sharon Bennett
Business
The Art of Drywall Restoration: Bringing Your Walls Back to Life
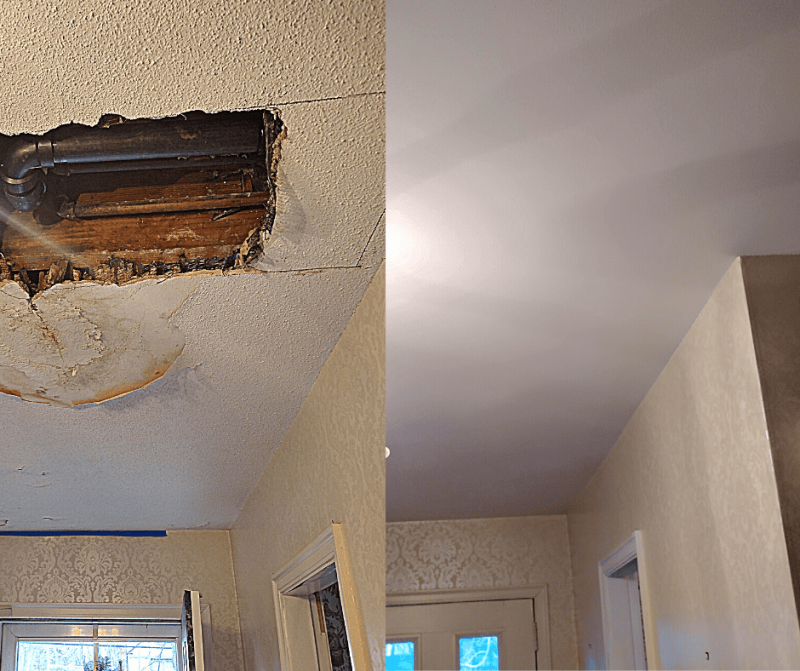
Walls are more than just structural elements; they are the canvas of your home, reflecting personality, style, and comfort. Over time, walls can suffer from cracks, dents, or water damage, leaving your living spaces looking worn and tired. This is where drywall restoration comes into play—a process that not only repairs damage but also rejuvenates your home’s appearance. In this guide, we’ll explore what drywall restoration entails, why it matters, and how to achieve flawless results.
Why Drywall Restoration is Essential for Your Home
A damaged wall might seem like a minor inconvenience but ignoring it can lead to bigger problems. Moisture seeping through cracks can cause mold growth, compromising both your home’s structure and your health. Additionally, even small dents or holes can create a sense of neglect in your living space. Investing in drywall restoration ensures your walls remain smooth, sturdy, and visually appealing.
- Enhances Property Value: Homes with well-maintained walls are more attractive to buyers. Even minor imperfections can affect resale value, so professional drywall restoration can be a smart investment.
The Step-by-Step Process of Drywall Restoration
Restoring drywall isn’t just about slapping on a layer of plaster; it’s a meticulous process that requires skill and attention to detail. Here’s a friendly walkthrough of how professionals typically handle it:
- Assessment and Preparation: The first step involves inspecting the damaged area. Professionals identify the type and extent of damage—whether it’s cracks, holes, water damage, or sagging panels. Preparing the surface correctly is critical to ensure long-lasting results.
- Repairing the Damage: Small holes and cracks are often filled with a joint compound. Larger sections of drywall may need replacement. During this stage, attention to detail is key. A well-prepped wall ensures a seamless finish once painting begins.
- Sanding and Smoothing: Once the compound is dry, it’s carefully sanded to create a smooth, even surface. This step is crucial for eliminating imperfections and achieving a professional-looking wall.
- Priming and Painting: After sanding, the wall is primed to ensure the paint adheres properly. Finally, a fresh coat of paint brings the wall back to life, completing the restoration process.
This step-by-step approach not only repairs damage but also revitalizes the overall look of your home.
Common Mistakes to Avoid in Drywall Restoration
Even though drywall restoration may seem straightforward, there are common pitfalls that can compromise results. Avoid these mistakes for a flawless finish:
- Using too much joint compound, which can lead to uneven surfaces.
- Skipping primer, which can cause paint to peel or discolor.
- Ignoring moisture issues, which can result in recurring damage.
By addressing these issues early, you can ensure your walls stay pristine for years to come.
Maintaining Your Walls After Drywall Restoration
Once your walls are restored, maintenance is key to keeping them looking fresh. Regularly inspect walls for small cracks or dents and address them promptly. Use gentle cleaning methods to avoid damaging the painted surface. A little care goes a long way in preserving the beauty of your drywall restoration efforts.
Conclusion:
Restoring your drywall is about more than just aesthetics—it protects your home, enhances its value, and creates a comfortable environment. Whether you’re repairing minor cracks or tackling extensive water damage, following a proper restoration process ensures long-lasting results. Remember, investing in professional drywall restoration not only solves current problems but also prevents future headaches, keeping your walls—and your home—looking their very best.
Source:
Click for the: Full Story
You might like