Close Menu
DTG PRO
Technology
How DTF Printers Work: A Step-by-Step Breakdown
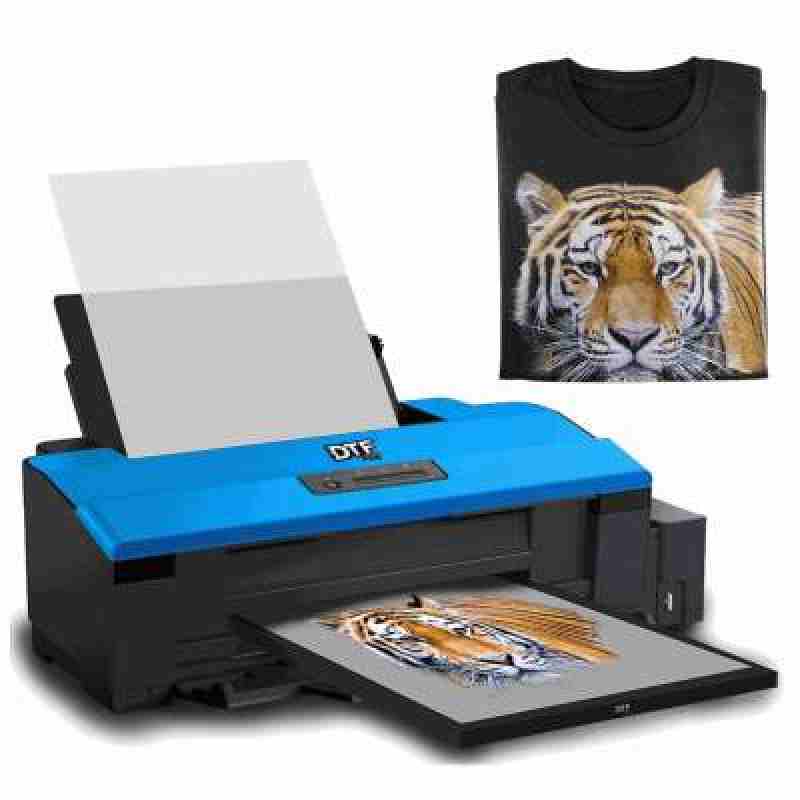
In the world of custom printing, a new method has been making waves—DTF printing, also known as Direct to Film printing. Whether you're a small business owner, a hobbyist, or someone curious about textile printing, understanding how DTF works can open the door to exciting creative possibilities.
DTF printers allow you to produce full-color designs on various fabrics without needing complicated prep steps or expensive machinery. This guide will walk you through the complete process from start to finish, in a way that’s clear and beginner-friendly.
What Makes DTF Printing Different?
Traditional printing methods like screen printing or direct-to-garment (DTG) have certain limitations. For instance, they may not work well on all types of fabrics, or they might require fabric pre-treatment. DTF printing skips those limitations. It’s fast, flexible, and offers outstanding print quality on cotton, polyester, blends, and even leather.
Let’s dive into how the process works step by step.
Step 1: Creating the Design
Every print starts with a digital design. You can either create your own or download ready-made designs online. Programs like Adobe Photoshop, CorelDRAW, or Canva are commonly used for creating the artwork.
Tips for a great print:
- Use high-resolution images (300 DPI or more)
- Save the design with a transparent background (usually as a PNG file)
- Choose colors that contrast well with your chosen fabric color
Once the design is ready, you load it into RIP software. This software tells the printer how to layer the colors and white ink, how much ink to use, and how the image will look when printed.
Step 2: Printing Onto Transfer Film
With the design set up, the next step is printing it onto PET transfer film. This film is specially coated to hold the ink and allow it to release cleanly onto fabric during transfer.
A DTF printer prints in two layers:
- Color Layer – First, the color parts of the image are printed.
- White Ink Layer – Then, a white layer is printed on top of the color layer.
Why the white ink? It acts as a base so that your design pops on any color fabric—even black.
Step 3: Applying the Adhesive Powder
Now that the image is on the film, the next step is to apply hot melt powder to the wet ink. This adhesive powder is what allows the design to stick to the fabric when pressed with heat.
You can apply the powder by hand or use an automatic powder shaker. Be sure to cover all inked areas evenly, and shake off any excess powder so that it doesn’t clump.
The powder only sticks to the ink, not the clear parts of the film. This ensures your final print is clean and professional-looking.
Step 4: Melting the Powder
Once the powder is applied, it needs to be cured—basically melted—so it can stick to the fabric during heat pressing.
This step can be done using:
- A curing oven
- A heat press in hover mode
- A tunnel dryer (for high-volume production)
Typical curing settings:
- Temperature: 160°C to 170°C
- Time: 2–3 minutes
The powder should turn slightly glossy but not bubble or burn. This is a crucial step, as over- or under-heating can affect the quality of the transfer.
Step 5: Transferring the Design to Fabric
Now comes the exciting part—transferring the design onto the fabric!
Place the film onto your garment or fabric surface, with the printed side facing down. Use a heat press to transfer the design. The heat activates the adhesive powder, bonding the design to the fabric.
Standard heat press settings:
- Temperature: 160°C to 170°C
- Time: 15–20 seconds
- Pressure: Medium
You can use this method on t-shirts, hoodies, tote bags, hats, and more.
Step 6: Let It Cool and Peel
After pressing, allow the film to cool completely before peeling it off. This is called a cold peel, and it ensures that the ink bonds properly to the fabric.
Once the film has cooled, peel it away gently and slowly. You’ll see your design now fully transferred to the fabric, looking sharp and vibrant.
Step 7: Optional Second Press
To make your design even more durable and to give it a soft finish, many users do a second press.
Place a piece of parchment paper, Teflon sheet, or silicone paper over the design and press it again for 5–10 seconds.
This second press:
- Removes any rough edges
- Makes the design smoother
- Helps the ink set into the fabric more permanently
What Materials Can You Print On?
This is one of the biggest advantages of DTF printing—you’re not limited to certain types of fabric.
DTF works on:
- 100% cotton
- 100% polyester
- Poly-cotton blends
- Nylon
- Leather
- Silk
- Denim
This means you can offer a wide range of products without changing your setup or using special chemicals.
How Long Do DTF Prints Last?
With proper application and heat pressing, DTF prints can last 40–50 washes or more without fading, cracking, or peeling.
To make sure your prints last:
- Don’t use too much or too little powder
- Always follow the correct time and temperature for heat pressing
- Recommend customers wash garments inside out, in cold water, and avoid high heat drying
What Equipment Do You Need?
To get started with DTF printing, you’ll need a few key items:
- DTF Printer – A printer designed to print both white and color ink layers onto film
- RIP Software – To prepare the design for printing
- PET Transfer Film – Special coated film for holding ink
- DTF Inks – Water-based inks including white and CMYK
- Adhesive Powder – Also called hot melt powder or TPU powder
- Heat Press – For transferring designs to garments
- Curing Oven (optional) – For melting adhesive powder more efficiently
The great thing is, you can start small and upgrade as your business grows.
Is DTF Printing Right for You?
DTF printing is perfect for:
- Small businesses offering custom apparel
- Print-on-demand stores
- Fashion designers and merch creators
- Hobbyists looking to try a new creative craft
It’s easy to learn, doesn’t require a large upfront investment, and offers great versatility. Whether you’re printing one shirt or 100, the process stays simple and consistent.
Final Thoughts
DTF printing is changing the custom apparel industry by offering a fast, affordable, and flexible way to print on all kinds of fabric. With just a few tools and a bit of practice, you can create professional-level designs that look great and last long.
Whether you’re starting a home business or adding new services to your print shop, understanding how this system works is the first step toward success.
So, if you've been looking for a modern, efficient, and high-quality printing method, a DTF printer could be the perfect solution to help you bring your creative ideas to life.
Sources:
https://logcla.com/blogs/579447/How-DTF-Printers-Work-A-Step-by-Step-Breakdown
https://blog.zamstudios.com/how-dtf-printers-work-a-step-by-step-breakdown/
Source:
Click for the: Full Story
You might like